Let's Make a Box
Author Ernie Wright
Date 29 May 2001
This is an introductory level plug-in tutorial. We'll be discussing a Modeler plug-in
that makes a box. The emphasis in this first installment is on the basic mechanics of
writing and compiling a plug-in. We don't want to get bogged down in the specifics of
creating geometry, so we'll make a simple shape, and we'll do it in the simplest available
way, using the MAKEBOX command. But don't worry, we'll get to some of the cool
stuff in later installments.
Our First Box Plug-in
Here's the entire source file for our first plug-in. This is included in the SDK
samples as the file sample/boxes/box1/box.c.
   #include <lwserver.h>
   #include <lwcmdseq.h>
   #include <stdio.h>

   XCALL_( int )
   Activate( long version, GlobalFunc *global, LWModCommand *local,
      void *serverData)
   {
      char cmd[ 128 ];

      if ( version != LWMODCOMMAND_VERSION )
         return AFUNC_BADVERSION;
      sprintf( cmd, "MAKEBOX <%g %g %g> <%g %g %g> <%d %d %d>",
         -0.5, -0.5, -0.5,  0.5, 0.5, 0.5,  1, 1, 1 );
      local->evaluate( local->data, cmd );
      return AFUNC_OK;
   }

   ServerRecord ServerDesc[] = {
      { LWMODCOMMAND_CLASS, "Tutorial_Box1", Activate },
      { NULL }
   };
A Closer Look
Let's break this down and examine the parts in detail.
   #include <lwserver.h>
   #include <lwcmdseq.h>
   #include <stdio.h>
These are the headers required by the plug-in. The first two, lwserver.h and lwcmdseq.h, are part of the LightWave SDK, in the include directory. lwserver.h contains definitions required by every plug-in. These are explained on the Common Elements page of the SDK, but I'll repeat some of that information less formally here. The second SDK header, lwcmdseq.h, contains the structure definitions and function prototypes comprising the CommandSequence plug-in class.
Classes: LightWave plug-ins are divided into different types, called classes. Each class does something different, or plugs into LightWave in a different place. The three Modeler classes are called CommandSequence (the kind we're looking at now), MeshDataEdit and MeshEditTool. The CommandSequence class drives Modeler by issuing commands.
We also include the C standard header stdio.h to get the function prototype
for sprintf, which we'll use to build the command string.
The order in which these are listed, meaning whether the C headers or the LightWave SDK
headers come first, usually doesn't matter. I put the SDK headers inside angle brackets (<
and >), which tells the compiler to look for them in the usual
place.
Most compilers allow you to add directories to the search path for this usual
place, and I use this to add the path to the SDK's include directory.
   XCALL_( int )
   Activate( long version, GlobalFunc *global, LWModCommand *local,
      void *serverData )
   {
This is the activation function, which happens to be the only function in our plug-in. Modeler will call this function when the user starts our plug-in. The actions of the plug-in are complete when this function returns.
Activation Function: Every plug-in has one. This is the entry point of a plug-in, sort of like
mainin a standard C program. Activation functions have a standard list of four arguments. The type of the third one depends on the plug-in class, but the others are always the same. The function doesn't have to be calledActivate.
The XCALL_ macro is defined in lwserver.h. It encloses the return
type of the function. XCALL_ is a placeholder for any platform-specific or
compiler-specific weirdness that might be required to get the calling conventions right.
If you've programmed Microsoft Windows, you know that Win32 defines several macros (WINAPI
and CALLBACK, for example) that serve a similar purpose.
Strictly speaking, XCALL_ should be used on every function in your source code
that can be called by LightWave. But as of this writing, XCALL_ has no effect on
any platform LightWave currently supports, and you might notice that I've gotten somewhat
careless in the SDK samples about using it for some callbacks. Just be aware that it might
be needed in the future.
For Modeler command plug-ins, the third argument to the activation function is a pointer to an LWModCommand structure, which is defined in lwcmdseq.h.
char cmd[ 128 ];
Plug-ins can declare data in all the ways any other C program or library can. This is the string in which we'll build our command.
      if ( version != LWMODCOMMAND_VERSION )
         return AFUNC_BADVERSION;
The first thing an activation function should do is ensure that the version is correct. As LightWave and the SDK develop over time, the definition of LWModCommand can change. The version number passed to your activation function tells you, among other things, which version of LWModCommand Modeler is passing to you.
The headers define symbols for the version number of each class's local data. This is
the version that matches the definition in the header. In other words, the version of
LWModCommand in lwcmdseq.h is LWMODCOMMAND_VERSION. If you recompile
your plug-in with newer headers, LWModCommand might be different, and if it is, LWMODCOMMAND_VERSION
will be also.
LightWave tries to be backward-compatible with older plug-ins. It will call your
activation function with different versions of the local data until you accept one of the
versions (by not returning AFUNC_BADVERSION) or until it runs out of versions to
try. With a couple of exceptions, it will start with the highest version first, so that
you'll run with the highest version of the API you accept. For more about this, see the Compatibility page.
      sprintf( cmd, "MAKEBOX <%g %g %g> <%g %g %g> <%d %d %d>",
         -0.5, -0.5, -0.5,  0.5, 0.5, 0.5,  1, 1, 1 );
      local->evaluate( local->data, cmd );
This is where something actually happens. We build a command string containing the
command and its arguments, then call the LWModCommand evaluate function to issue
the command.
Function Pointers: These may be new to you. The plug-in API makes extensive use of them as a means of allowing separate modules (in this case Modeler and the plug-in) to call each other's functions.
A pointer to a function can be used like pointers to anything else. They can appear in arguments, arrays and structures. When you dereference a function pointer, you're calling the function. The
evaluatemember of the LWModCommand structure is a pointer to a function that takes two arguments and returns an int.A call to a function through a pointer is sometimes written with an explicit dereference operator, like this.
result = ( *local->evaluate )( local->data, cmd );The parentheses are necessary to ensure that the
*binds to the function pointer. The result of writing the call this way is exactly equivalent to writing it without the*, but it may clarify what's going on for human readers, and in rare cases it can prevent the C preprocessor from making incorrect macro substitutions.
The first argument to evaluate is the data field of the LWModCommand
structure. data is an opaque pointer, meaning you're not supposed to know what it
points to. This is data owned by Modeler, that Modeler uses to keep track of what it's
doing. The second argument is the MAKEBOX command string.
The MAKEBOX command is described on the Modeler Commands page. It takes two required arguments, the
coordinates of the low and high corners, and one optional argument, the number of segments
along each axis. Each of these arguments is a vector, a triple of three numbers, delimited
by angle brackets (< and >).
Since we're making a cube centered on the origin, all three numbers in each vector are
the same. We could simplify the command string somewhat by writing only the first value in
each vector. And since the values are constants, we don't need sprintf at all. We
could have written instead,
local->evaluate( local->data, "MAKEBOX <-.5> <.5> <1>" );
When vector components are omitted, their values are taken from the last one included.
      return AFUNC_OK;
   }
The activation function returns AFUNC_OK to indicate that it completed
successfully.
The LWModCommand evaluate function returns 0 to indicate success, or a
non-zero error code if something went wrong. For our simple plug-in, we're ignoring evaluate's
return value, but in non-trivial code, you'll probably want to react to errors, and this
might involve returning something other than AFUNC_OK from your activation
function.
   ServerRecord ServerDesc[] = {
      { LWMODCOMMAND_CLASS, "Tutorial_Box1", Activate },
      { NULL }
   };
The ServerRecord array lists the plug-ins contained in a plug-in (.p) file. Our source
code defines only one plug-in. Its class is LWMODCOMMAND_CLASS, its server name
is Tutorial_Box1
and its activation function is Activate. Although we
don't use it here, the ServerRecord also allows you to specify a user name that differs
from the server name, along with other information about the plug-in supplied as an array
of tags.
On each platform LightWave supports, the operating system provides a standard method of
loading the .p file as a shared or dynamically-linked library and of obtaining the address
within the library of the ServerRecord array. On Windows, for example, LightWave uses the
Win32 LoadLibrary and GetProcAddress functions. Once LightWave has the
address of the ServerRecord array, it can read the list of plug-ins in the file and find
the activation functions.
Building the Plug-in
The Compiling page of the SDK gives detailed instructions for creating a .p file from your C source code. But the instructions there can be a little bewildering if your experience with setting compiler switches and building DLLs or shared libraries is limited. So I thought I'd show you how I build plug-ins on my own machine with the compiler I'm using, Microsoft Visual C++ version 4.0 Standard.
This obviously won't be so helpful for people using different compilers and platforms, but hopefully it will at least demystify the process a little for them and demonstrate that no rocket science is involved.
Begin by creating a new project workspace. Make sure the project type is Dynamic-Link Library.

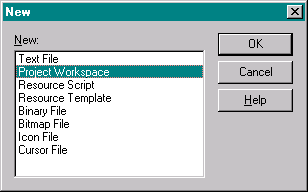
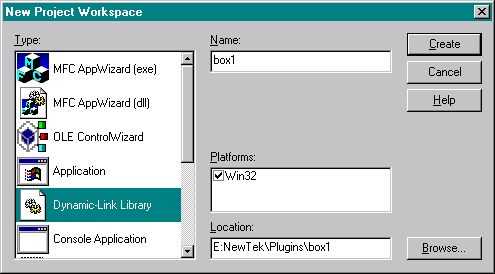
Insert your source files into the project. You also need to insert a small amount of code from the SDK.
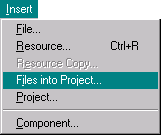
The Compiling page tells you how to build the SDK code into a library called server.lib, and if you've done that already, you can just insert server.lib here. Or you can add server.lib to the library files listed on the Link tab of the Settings dialog. The effect is the same.
But if you haven't built server.lib, you can instead insert the SDK files startup.c and shutdown.c from the source directory. The advantage of this approach is that you get both debug and release builds of the SDK code without having to worry about keeping track of two versions of server.lib.
Either way, you'll also need to insert servmain.c and serv.def. The
sole purpose of the .def file is to tell the linker to export the symbol _mod_descrip.,
which is defined in servmain.c. _mod_descrip contains your ServerDesc array,
among other things, and exporting it makes it visible to other programs like LightWave
that call the Win32 GetProcAddress function.
Once you've gotten all your sources into your project, you're ready for the compile and link settings that will turn it into a .p file. Open the settings dialog.
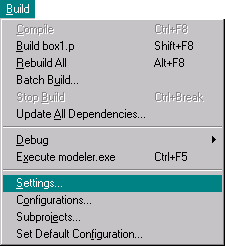
We're only concerned here with settings on three of the tabs: the Debug, C/C++ and Link tabs. The information you enter on the Debug tab allows you to debug your plug-in using the windowed debugger in MSVC. You can set breakpoints in your code, step through it line by line, and examine the values of variables.
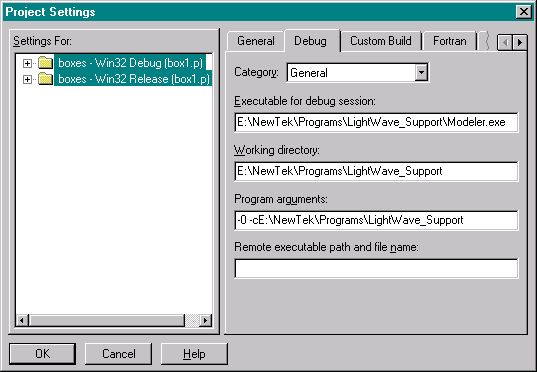
In the edit field labelled Executable for debug session:
, you'll enter the
path to your installation of either Layout (Lightwav.exe) or Modeler (Modeler.exe),
depending on which part of LightWave your plug-in is intended to run in. Our box plug-in
runs in Modeler.
The Working directory:
will typically be the same as the Start
in:
directory for your LightWave installation. To find that, look on the Shortcut
tab of the Properties panel for the icon or the Startup Menu entry that launches LightWave
on your system. Also look there for the program arguments you normally use. I usually set
mine to run without the Hub and to write the config files in the directory where the
program files are.
You might also want to add the -d switch, which runs the LightWave component in a
debug
mode. In this mode, plug-in files are always closed and detached when
not in use, making it possible to recompile them while LightWave remains open. LightWave
may also create a text file error dump when certain plug-in related problems occur.

Like a lot of compilers, MSVC gives you the option of precompiling the headers, and it does this by default. The headers for a project tend not to change as often as the C sources, so in theory this can save a small amount of time, especially when you're including the Win32 headers and compiling on a slow machine. But the .pch files MSVC creates can be surprisingly large, over a megabyte for the Win32 headers, and these are created redundantly for each project. And they don't really save that much time. So I always turn this option off.
I also turn off incremental linking, mostly for similar reasons, but also to avoid the small chance that it will introduce errors by failing to rebuild code affected by changes elsewhere in the project.
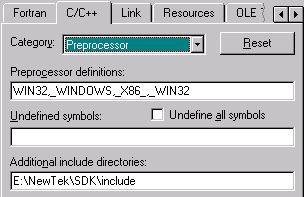
On the C/C++ tab, under Preprocessor, add _X86_ and _WIN32 to the
preprocessor definitions. The SDK source and the lwdisplay.h header use these
symbols to select platform-specific code. In the Additional include
directories:
field, enter the path to the SDK include directory.

The last settings step is renaming the output file so that it has a .p extension. This isn't strictly necessary. You can rename the file later, or simply use it with its default .dll extension, which LightWave has no problem with. If you do rename the file here, make sure only one of the two builds is selected in the left pane before altering the filename. If both are selected, the debug and release builds will have the same name and will overwrite each other.
You're now ready to build. By default, the toolbar includes a dropdown list from which
you can select the debug or release builds of your project. During development, you'll
usually want to be building and testing the debug version. Once you've chosen the build,
select Build box1.p
(Shift + F8) or Rebuild All
(Alt + F8) from
the Build menu, or hit the little build icon on the toolbar.
To run the plug-in, hit Execute Modeler.exe
in the same menu. If this is
the first time you've run the plug-in, you'll need to install it in LightWave. Use the Add
Plug-ins option (in the Modeler/Plug-ins or Layout/Plug-ins menu) and in the file dialog,
navigate to the .p file you created. Unless you changed the path, your .p file will be in
the Debug directory created by MSVC in your project directory.
To debug your plug-in, select one of the Debug submenu options, typically Go. MSVC will warn you that the LightWave component contains no debugging information. That's OK, since you're not debugging LightWave itself. The debug build of your plug-in does contain this information. Before hitting Debug/Go, you'll typically set one or more breakpoints, so that execution stops at those points and you can examine the state of the plug-in's data. Put the cursor in one of your source files in the MSVC editor and press F9 to set a breakpoint there.
What's Next
If all's gone well, you've learned how to write, compile and run a Modeler plug-in. In the next installment, we'll work on calling Modeler commands in a more sophisticated way, and we'll add a user interface.